一、概念架构:
Core Text
是基于 iOS 3.2+ 和 OSX 10.5+ 的一种能够对文本格式和文本布局进行精细控制的文本引擎。
它良好的结合了 UIKit 和 Core Graphics/Quartz:
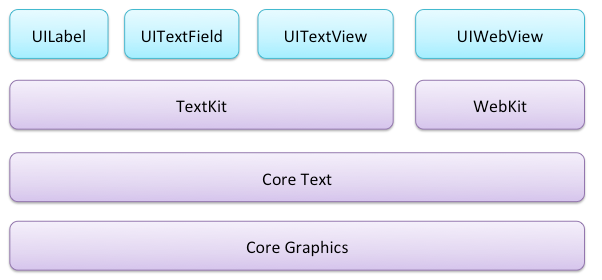
UIKit 的 UILabel 允许你通过在 IB 中简单的拖曳添加文本,但你不能改变文本的颜色和其中的单词。
Core Graphics/Quartz几乎允许你做任何系统允许的事情,但你需要为每个字形计算位置,并画在屏幕上。
Core Text 正结合了这两者!你可以完全控制位置、布局、类似文本大小和颜色这样的属性,而 Core Text 将帮你完善其它的东西——类似文本换行、字体呈现等等。
Text Kit
Text Kit 是一系列类和协议,这些类和协议提供了高性能的排版服务,这个服务可以让应用以很好的排版形式存储、布局和展示所有的字符,比如字间距、连笔、断行、两端对齐。是基于Core Text构建的快速、先进的文本排版和渲染引擎,并且与UIKit很好的集合。UITextView,UITextField、UILabel都已经基于Text Kit重新构建,所以它们都支持分页文本、文本包装、富文本编辑、交互式文本着色、文本折叠和自定义截取等特性。
二、CoreText
CoreText绘制的流程图
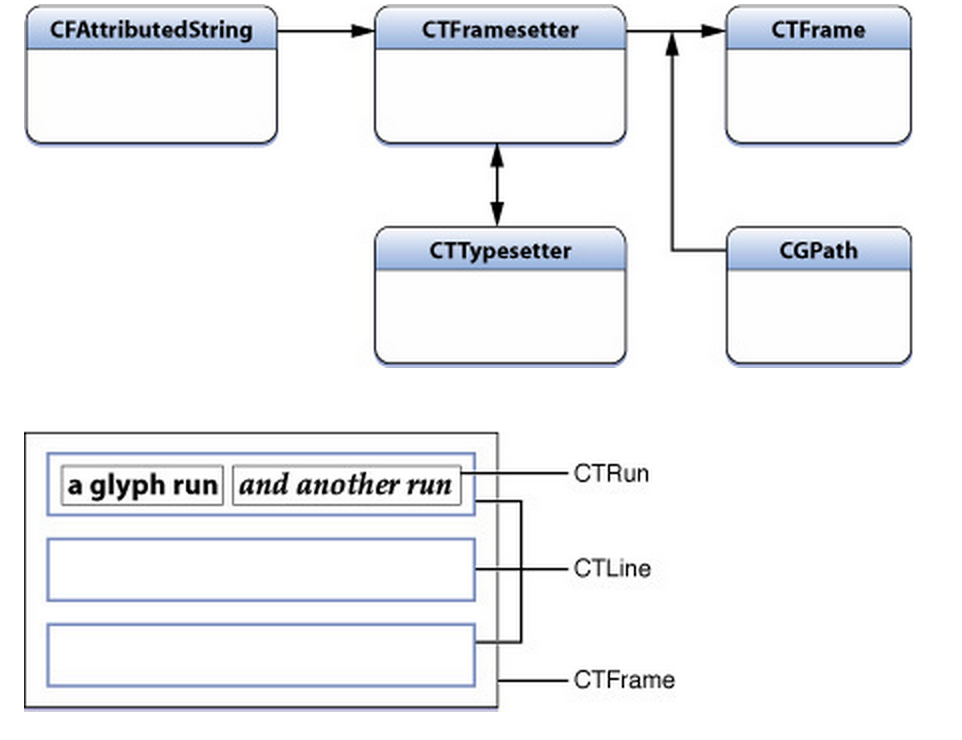
CFAttributedStringRef :属性字符串,用于存储需要绘制的文字字符和字符属性
CTFramesetterRef:通过CFAttributedStringRef进行初始化,作为CTFrame对象的生产工厂,负责根据path创建对应的CTFrame
- CTFrameRef:画布,包含多个CTLine
- CTLineRef:每一行就是一个CTLine
- CTRunRef:每一行可以分为多个属性相同的小段,每一个小段就是一个CTRun
先来一个简单的富文本排版:
获取Context->变换坐标->设置绘制路劲->创建富文本字符串->由富文本字符串转成framesetter->根据framesetter得到画的的CTFrame->在Context里面画->手动释放CoreFoundation。
- (void)drawRect:(CGRect)rect {

    [super drawRect:rect];

    CGContextRef context = UIGraphicsGetCurrentContext();

    //变换坐标
    CGContextSetTextMatrix(context, CGAffineTransformIdentity);
    CGContextTranslateCTM(context, 0, self.bounds.size.height);
    CGContextScaleCTM(context, 1.0, -1.0);

    //设置绘制的路径
    CGMutablePathRef path = CGPathCreateMutable();
    CGPathAddRect(path, NULL, self.bounds);

    //创建属性字符串
    NSMutableAttributedString * attStr = [[NSMutableAttributedString alloc] initWithString:str4];

    //颜色
    [attStr addAttribute:(__bridge NSString *)kCTForegroundColorAttributeName value:(__bridge id)[UIColor redColor].CGColor range:NSMakeRange(5, 10)];

    //字体
    UIFont * font = [UIFont systemFontOfSize:25];
    CTFontRef fontRef = CTFontCreateWithName((__bridge CFStringRef)font.fontName, 25, NULL);
    [attStr addAttribute:(__bridge NSString *)kCTFontAttributeName value:(__bridge id)fontRef range:NSMakeRange(20, 10)];

    //空心字
    [attStr addAttribute:(__bridge NSString *)kCTStrokeWidthAttributeName value:@(3) range:NSMakeRange(36, 5)];
    [attStr addAttribute:(__bridge NSString *)kCTStrokeColorAttributeName value:(__bridge id)[UIColor blueColor].CGColor range:NSMakeRange(37, 10)];

    //下划线
    [attStr addAttribute:(__bridge NSString *)kCTUnderlineStyleAttributeName value:@(kCTUnderlineStyleSingle | kCTUnderlinePatternDot) range:NSMakeRange(45, 15)];


    CTFramesetterRef framesetter = CTFramesetterCreateWithAttributedString((CFAttributedStringRef)attStr);
    CTFrameRef frame = CTFramesetterCreateFrame(framesetter, CFRangeMake(0, attStr.length), path, NULL);

    //绘制内容
    CTFrameDraw(frame, context);

    CFRelease(fontRef);
    CFRelease(frame);
    CFRelease(path);
    CFRelease(framesetter);
}
@end
实际上CoreText是不直接支持绘制图片的,但是我们可以先在需要显示图片的地方用一个特殊的空白占位符代替,同时设置该字体的CTRunDelegate信息为要显示的图片的宽度和高度,这样绘制文字的时候就会先把图片的位置留出来,再在drawRect方法里面用CGContextDrawImage绘制图片。
CoreText实现表情混排的原理,在简介中介绍过,一个CTLine代表一行,而一个CTLine又由多个CTRun组成,这里实现表情混排的原理其实就是把CTLine中的某一个CTRun替换成空白字符,然后再根据这个CTRun的具体位置,把图片绘制到这个位置上
    - (void)drawRect:(CGRect)rect {

    [super drawRect:rect];    // 省略步骤1-4  ,步骤8
    // 步骤9:图文混排部分
    // CTRunDelegateCallbacks:一个用于保存指针的结构体,由CTRun delegate进行回调
    CTRunDelegateCallbacks callbacks;
    memset(&callbacks, 0, sizeof(CTRunDelegateCallbacks));
    callbacks.version = kCTRunDelegateVersion1;
    callbacks.getAscent = ascentCallback;
    callbacks.getDescent = descentCallback;
    callbacks.getWidth = widthCallback;
    // 图片信息字典
    NSDictionary *imgInfoDic = @{@"width":@100,@"height":@30};
    // 设置CTRun的代理
    CTRunDelegateRef delegate = CTRunDelegateCreate(&callbacks, (__bridge void *)imgInfoDic);
    // 使用0xFFFC作为空白的占位符
    unichar objectReplacementChar = 0xFFFC;    NSString *content = [NSString stringWithCharacters:&objectReplacementChar length:1];    NSMutableAttributedString *space = [[NSMutableAttributedString alloc] initWithString:content];    CFAttributedStringSetAttribute((CFMutableAttributedStringRef)space, CFRangeMake(0, 1), kCTRunDelegateAttributeName, delegate);    CFRelease(delegate);
    // 将创建的空白AttributedString插入进当前的attrString中,位置可以随便指定,不能越界
    [attrString insertAttributedString:space atIndex:50];
    // 省略步骤5-6

    // 步骤10:绘制图片
    UIImage *image = [UIImage imageNamed:@"coretext-img-1.png"];    CGContextDrawImage(context, [self calculateImagePositionInCTFrame:frame], image.CGImage);
    // 省略步骤7
 }
 #pragma mark - CTRun delegate 回调方法

 static CGFloat ascentCallback(void *ref) {
    return [(NSNumber *)[(__bridge NSDictionary *)ref objectForKey:@"height"] floatValue];
 } static CGFloat descentCallback(void *ref) {
    return 0;
 }
 static CGFloat widthCallback(void *ref) {
    return [(NSNumber *)[(__bridge NSDictionary *)ref objectForKey:@"width"] floatValue];
 }
 /**
 *  根据CTFrameRef获得绘制图片的区域
 *
 *  @param ctFrame CTFrameRef对象
 *
 *  @return绘制图片的区域
 */
 - (CGRect)calculateImagePositionInCTFrame:(CTFrameRef)ctFrame {
    // 获得CTLine数组
    NSArray *lines = (NSArray *)CTFrameGetLines(ctFrame);    NSInteger lineCount = [lines count];    CGPoint lineOrigins[lineCount];
    CTFrameGetLineOrigins(ctFrame, CFRangeMake(0, 0), lineOrigins);
    // 遍历每个CTLine
    for (NSInteger i = 0 ; i < lineCount; i++) {

        CTLineRef line = (__bridge CTLineRef)lines[i];        NSArray *runObjArray = (NSArray *)CTLineGetGlyphRuns(line);
        // 遍历每个CTLine中的CTRun
        for (id runObj in runObjArray) {

            CTRunRef run = (__bridge CTRunRef)runObj;            NSDictionary *runAttributes = (NSDictionary *)CTRunGetAttributes(run);
            CTRunDelegateRef delegate = (__bridge CTRunDelegateRef)[runAttributes valueForKey:(id)kCTRunDelegateAttributeName];            if (delegate == nil) {                continue;
            }
            NSDictionary *metaDic = CTRunDelegateGetRefCon(delegate);            if (![metaDic isKindOfClass:[NSDictionary class]]) {                continue;
            }
            CGRect runBounds;            CGFloat ascent;            CGFloat descent;

            runBounds.size.width = CTRunGetTypographicBounds(run, CFRangeMake(0, 0), &ascent, &descent, NULL);
            runBounds.size.height = ascent + descent;
            CGFloat xOffset = CTLineGetOffsetForStringIndex(line, CTRunGetStringRange(run).location, NULL);
            runBounds.origin.x = lineOrigins[i].x + xOffset;
            runBounds.origin.y = lineOrigins[i].y;
            runBounds.origin.y -= descent;
            CGPathRef pathRef = CTFrameGetPath(ctFrame);            CGRect colRect = CGPathGetBoundingBox(pathRef);
            CGRect delegateBounds = CGRectOffset(runBounds, colRect.origin.x, colRect.origin.y);            return delegateBounds;
        }
    }    return CGRectZero;
 }
三、TextKit架构解析
1、NSMutableAttributedString
NSAttributedString是NSObject的一个子类,可以利用对文本设置颜色字体间距等属性
attributeDict字典中存放一些属性名和属性值
NSDictionary *attributeDict = [NSDictionarydictionaryWithObjectsAndKeys:
                                    [UIFontsystemFontOfSize:15.0],NSFontAttributeName,
                                    [UIColorredColor],NSForegroundColorAttributeName,
                                   NSUnderlineStyleAttributeName,NSUnderlineStyleSingle,nil];
NSMutableAttributedString *attributedStr = [[NSMutableAttributedStringalloc]initWithString:@"今天天气还可以" attributes:attributeDict];
testLabel.attributedText = attributedStr;
#这是对部分字设置属性的方法
[attributedStr addAttribute:NSFontAttributeName value:[UIFont systemFontOfSize:16.0]                        range:NSMakeRange(2, 2)];
常见属性:
NSFontAttributeName 设置字体属性,默认值:字体:Helvetica(Neue) 字号:12
NSForegroundColorAttributeNam 设置字体颜色,取值为 UIColor对象,默认值为黑色
NSBackgroundColorAttributeName 设置字体所在区域背景颜色,取值为 UIColor对象,默认值为nil, 透明色
NSLigatureAttributeName 设置连体属性,取值为NSNumber 对象(整数),0 表示没有连体字符,1 表示使用默认的连体字符
NSKernAttributeName 设定字符间距,取值为 NSNumber 对象(整数),正值间距加宽,负值间距变窄
NSStrikethroughStyleAttributeName 设置删除线,取值为 NSNumber 对象(整数)
NSStrikethroughColorAttributeName 设置删除线颜色,取值为 UIColor 对象,默认值为黑色
NSUnderlineStyleAttributeName 设置下划线,取值为 NSNumber 对象(整数),枚举常量 NSUnderlineStyle中的值,与删除线类似
NSUnderlineColorAttributeName 设置下划线颜色,取值为 UIColor 对象,默认值为黑色
NSStrokeWidthAttributeName 设置笔画宽度,取值为 NSNumber 对象(整数),负值填充效果,正值中空效果
NSStrokeColorAttributeName 填充部分颜色,不是字体颜色,取值为 UIColor 对象
NSShadowAttributeName 设置阴影属性,取值为 NSShadow 对象
NSTextEffectAttributeName 设置文本特殊效果,取值为 NSString 对象,目前只有图版印刷效果可用:
NSBaselineOffsetAttributeName 设置基线偏移值,取值为 NSNumber (float),正值上偏,负值下偏
NSObliquenessAttributeName 设置字形倾斜度,取值为 NSNumber (float),正值右倾,负值左倾
NSExpansionAttributeName 设置文本横向拉伸属性,取值为 NSNumber (float),正值横向拉伸文本,负值横向压缩文本
NSWritingDirectionAttributeName 设置文字书写方向,从左向右书写或者从右向左书写
NSVerticalGlyphFormAttributeName 设置文字排版方向,取值为 NSNumber 对象(整数),0 表示横排文本,1 表示竖排文本
NSLinkAttributeName 设置链接属性,点击后调用浏览器打开指定URL地址
NSAttachmentAttributeName 设置文本附件,取值为NSTextAttachment对象,常用于文字图片混排
NSParagraphStyleAttributeName 设置文本段落排版格式,取值为 NSParagraphStyle 对象
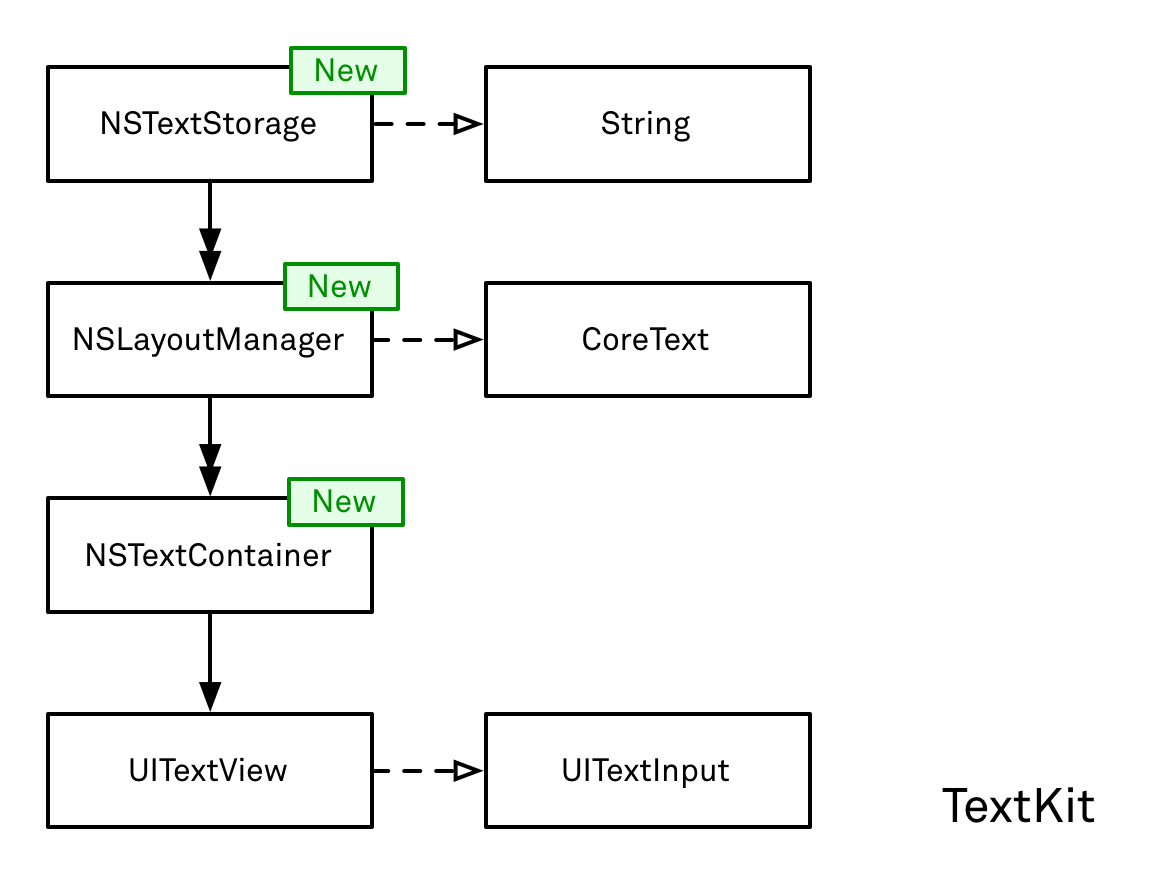
2、NSTextStorage
NSTextStorage本身继承与NSMutableAttributedString,这两者唯一的重大不同点是文本存储包含了一个方法来发送内容改变的通知,它是以attributed string的形式保存需要渲染的文本,并在文本内容改变的时候通知到对应的layout manager对象。通常你需要创建NSTextStorage的子类来在文本改变时进行文本显示样式的更新。
3、NSLayoutManager
NSLayoutManager作为文本控件中的排版引擎接收保存的文本并在屏幕上渲染出来。
1、这个管理器监听文本存储中文本或属性改变的通知,一旦接收到通知就触发布局进程。
2、从文本存储提供的文本开始,它将所有的字符翻译为字形(Glyph)(附注2).
3、一旦字形全部生成,这个管理器向它的文本容器(们)查询文本可用以绘制的区域
4、然后这些区域被行逐步填充,而行又被字形逐步填充。一旦一行填充完毕,下一行开始填充。
5、对于每一行,布局管理器必须考虑断行行为(放不下的单词必须移到下一行)、连字符、内联的图像附件等等。
6、当布局完成,文本的当前显示状态被设为无效,然后文本管理器将前面几步排版好的文本设给文本视图。
4、NSTextContainer
NSTextContainer描述了文本在屏幕上显示时的几何区域,每个text container与一个具体的UITextView相关联。如果你需要定义一个很复杂形状的区域来显示文本,你可能需要创建NSTextContainer子类。
每个文本视图定义了一个文本可以绘制的区域。为此,每个文本视图都有一个文本容器,它精确地描述了这个可用的区域。在简单的情况下,这是一个垂直的无限相当大的矩形区域。文本被填充到这个区域,并且文本视图允许用户滚动它。然而,在更高级的情况下,这个区域可能是一个无限大的矩形。例如,当渲染一本书时,每一页都有最大的高度和宽度。文本容器会定义这个大小,并且不接受任何超出的文本。相同情况下,一幅图像可能占据了页面的一部分,文本应该沿着它的边缘重新排版。
5、UITextView
UITextView作为显示出来的实际的文本视图,在 TextKit 中,文本视图有两个目的:第一,它是文本系统用来绘制的视图。文本视图它自己并不会做任何绘制;它仅仅提供一个供其它类绘制的区域。作为视图层级机构中唯一的组件,第二个目的是处理所有的用户交互。具体来说,文本视图实现 UITextInput 的协议来处理键盘事件,它为用户提供了一种途径来设置一个插入点或选择文本。它并不对文本做任何实际上的改变,仅仅将这些改变请求转发给刚刚讨论的文本存储。
四、TextKit实例
1、添加图片-NSTextAttachment
NSTextAttachment用于添加图片
	//添加表情
    UIImage * image = [UIImage imageNamed:@"011"];
    NSTextAttachment * attachment1 = [[NSTextAttachment alloc] init];
    #表情的大小
    attachment.bounds = CGRectMake(0, 0, 15, 15);
    attachment.image = image;
    NSAttributedString * attachStr = [NSAttributedString 		attributedStringWithAttachment:attachment];

    #根据占位符,将文字换成表情
    NSRange range = [[str string]rangeOfString:@"[icon]"];
    [str replaceCharactersInRange:range withAttributedString:attachStr];
2、文字环绕图片-exclusionPaths
UIBezierPath * path = [UIBezierPath bezierPathWithRect:rect];
textView.textContainer.exclusionPaths = @[path];
rect就是文字会环绕的区域
Demo地址:Github-TextKit